Ptex Base Repair

How to Apply P-tex
- This section describes how to perform routine repairs to a ski/snowboard base. A hole clear through the base (aka core shot) or along the metal edge is best addressed by watching the advanced repair video below on this subject.
- Equipment list: Clear or black P-Tex candles; Knife; matches/lighter; Plexiglass scraper; Metal scraper; Sandpaper, 320 grit; Grey base pad
- Small nicks and scratches should be left alone
- Repair gouges that are deep enough to interfere with structure
- You may use base cleaner to clean the area to be repaired, but do not use cleaner on the entire base.
- Before starting the process of dripping p-tex, remove any flammable cleaners from the work area to a safe place.
- Sharpen the end of the p-tex candle so it will light easier.
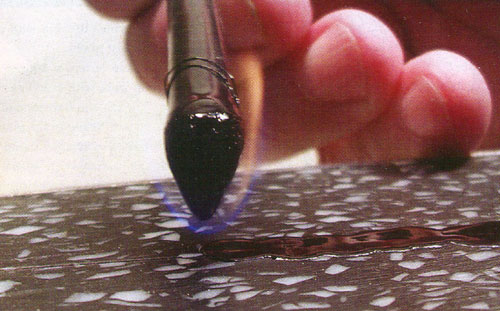
- Light one end of a P-Tex candle with a match/torch; hold the candle above the flame.
- CAUTION! A P-Tex candle burns very hot (>970 F); Severe burns can result if dripped on skin.
- Ventilate room if you recently used fluoro waxes.
- Hold the candle close to the base to reduce carbon (black) formation from the burning process (see important notes at the bottom of the page).
- Use the metal scraper to catch any unwanted p-tex drips as you move to the damaged area.
- Keep the candle spinning to reduce the build up of unsightly carbon that not only looks bad in the repair, but weakens the bond as well. If carbon does appear, dab it off on the metal scraper.
- Take your time and let the p-tex flow into the gouges slowly. Going slowly will let the base preheat and accept the p-tex better.
- If the p-tex continues to burn on the base, blow the flame out so the base does not overheat.
- Deeper gouges should be filled in multiple passes, allowing each layer to cool before adding the next. Any repairs on damage near the edge or very deep should begin with metal grip and a soldering iron (see video below). Keep in mind that p-tex candles are too soft to withstand snow abrasion and will wear out; you may wish to consider a professional repair job.
- Slightly overfill the gouges.
- After repairs have cooled, remove excess material by planing it off with a metal scraper.
- Sand with 320 grit sandpaper and the gray base pad (from the 3-pad set).
- Remove any micro hairs by making a few passes with a sharp plexiglass scraper. Waxing with a hard wax will also help remove hairs by standing them up for the scraping step.
- Structure if needed with a coarse metal brush and gray pad.
To prevent carbon formation when using p-tex: The key is to maintain a blue flame (don't let it burn orange). To do this, keep it low to the base or close to a metal scraper. This will minimize carbon buildup. First light, then, holding the candle at a 45 degree angle and rotate the lit portion against the metal scraper to get rid of the carbon. What that also means is that you're holding a metal scraper in your off hand, rotating the candle and scraping off the black drips, then bringing both scraper and ptex next to the section to be repaired. It is hard to describe, but basically, get as low as you can without putting out the flame. Here the ptex no longer drips, but the ptex becomes molten and pours out in one long run. The carbon floats on top and when you scrape it, it comes right off.
To repair base bubbles (from overheating a base): Either 1) First, drill a small hole or make a small slit with a razor knife through the p-tex in the center of the bubble. Inject a little epoxy inside the bubble using an epoxy syringe, then use some c-clamps and steel scrapers as plates to press out the bubble and let the epoxy dry. A longer setting epoxy is better than a quick one. 2) If this fails, you can cut out the bubble with a razor knife, then using a soldering iron apply a very thin layer of metal grip (a blend of epoxy/ptex) to cover the exposed fiberglass, let it dry and fill in the area with p-tex repair material using a repair iron or pistol.
Extended Overview & Advanced Repairs
Core Shot Repair
Another Version
On Edge Core Shot Repair with Metal Grip (sent in by customer)
The ski injury was a sharp downward hit that caused the outer edge to deform about 6 inches back from the tip into a small peak instead of a smooth curvature up the shovel tip. The hit caused a small 1-inch bubble under the ptex base due to delamination from the ski core. I skied all last season with the bubble but did fill the edge side with marine epoxy to seal it. This past November, I had ski shop do a base grind for flattening but they also ended up grinding the edge at the small peak so thin. Since the bubble was gone, they put a small ptex patch over the base core and edge keys. A couple times skiing simply just exposed the edge peak. In addition, my wax scraping did not help as it also exposed the metal edge peak even more.
See the overlapped before/after picture below.
The Before-Picture (on left) is shot directly towards the base showing the cutout with metal edge keys and ski core exposed. I taped around the area to half fill with Metal Grip. Not shown in picture was the gap between metal edge and the top sheet of the ski. There is a gap of roughly 1/8 inch where I can insert a razor point and it would go under the edge keys. The cutout is about 2 inches long by half inch wide.
First step was to melt-in Metal Grip over the edge keys and push it under to seep out on the side to fill 1/8 inch gap. I filled most of the cutout with Metal Grip and then let cool about 1 hour. The carefully shaved out about ½ to get below the actual base level at each end of the cutout. Used the Stanley tool (cheese shaver like) to work on the Metal Grip. Finally, a little sanding to rough the top surface. Using rubbing alcohol to clean material at various stages. Used a heat gun to pre-heat the cutout before melting-in the Metal Grip. Frankly a very easy 1st step with the KUU base repair tool.
Final step was simply melting ptex ribbon (slick sticks) over the Metal Grip until cutout was slightly over filled. After using the KUU tool to melt ptex in, I went over with heat gun which really melted smooth the small ridges from the wide iron tip. More shaving with Stanley tool to smooth out and did another ptex layer over total area. Heat gun and Stanley tool again to smooth out. Final ptex melt was to cover the edge peak high point in the middle of the cutout. Looks like a small ptex bump that covers the edge peak. See the After-Picture (on right) for final results.
If you look closely at picture, you can see the cutout outline and 2 horizontal lines where the edge peak is. Base repair is not perfect but I’m really pleased with results being my first time doing repair this involved. I finished hot waxing the skis and the base repair is rock solid. 