 Video Archive
A collection of training videos & tutorials.
 Wax Wizard
Find the right wax for the right conditions.
 Ski & Board Wax
Racing wax for Snowboarding & Skiing.
 Tuning Tools
Use the same tools the pro’s use.
Tuning Kit Instructions
Ski and Snowboard Tuning Kit Instructions
The Elite/Diamond/Universal kit line below was introduced in the summer of 2020.For older generation RaceWax kit instructions, click here.
Tuning Kit Instructions:
Elite/Elite-Digital Kits (below) | or jump to Diamond Kit Instructions | Universal Kit InstructionsElite Kit Instructions:
- Kit Contents:
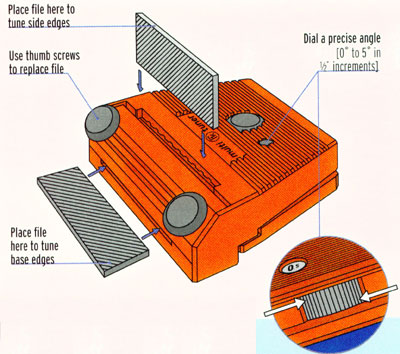
- Swix Base-Side Dual Edge Tool. Dial a precise side angle from 0 degree to 5 degrees and base angle of 0.5 to 1.0 degree -- use to set/maintain angles for boards and skis;
- High-quality Swiss-made ICECUT metal file -- first time especially, start with this file to set and establish the angle so as to match it to your tool;
- Diamond Stone -- use to routinely sharpen by placing in the edge tool instead of the file - frequent use of the file will wear down your edges - always use wet!;
- Warm/Cold Temperature Ski Waxes;
- Clear Plexi Wax Scraper -- for scraping excess wax off you ski or board;
- Metal Scraper -- to scrape/plane ptex dripped on to repair base gouges;
- Gummi Stone -- a rubber block with embedded grit for edge rust removal, detuning, and burr removal;
- Small Brass File Cleaning Brush -- used to keep files clean and free of metal waste;
- Clear P-Tex rod -- flow into gouges in your base to repair it, for use in colored areas of base;
- Black P-Tex rod -- flow into gouges in your base to repair it, for use in black areas of base;
- One pair (two) brake retainers -- holds ski brake during edge tuning (not needed for snowboards);
- Brass Brush -- for renewing base structure, opening pores before you wax, and brushing hard waxes;
- Nylon Brush -- the workhorse of wax removal. Designed to be stiff enough to remove wax in less passes to save time;
- Horsehair Brush -- for removing wax from the fine structure of your base;
- Elite -- analog waxing iron; Elite-Digital -- digital control/display waxing iron.
RaceWax & Swix partnered to design this all-in-one multi edge tool for the Elite kit.
Elite Kit Quick Start Instructions
- Advanced tuners should refer to more expanded discussions in topic-specific sections of the Learning Center (e.g., Edge Tuning).
- Apply brake retainers to hold brakes away from the work area. Snowboards do not have brakes.
- First prepare your edges. Examine them for roughness or nicks; remove these imperfections with gummi or diamond stones as needed.
- If you don't know what angle your ski/board is set at before you start, mark the metal edge with a sharpie, start the tool at the lowest angle and see if it removes the marking on your edge. If not, increase the angle and repeat until the metal file hits the metal edge and removes the mark; that is your bevel angle.
- Base Edge. Mount the ski flat or at a comfortable angle if your vise permits. The amount of base edge bevel will affect the ability of the ski/board to engage a turn on the snow. The more base edge bevel, the easier it will be to pivot or slide from side to side. Most base bevels are set to 1.0 degrees. With a new pair of skis the non-race skier may wish to start with a 0.5 degree bevel, and if your edges are locking in to a turn too soon, you can move up to 0.75 or 1 degree. To go back to a lower bevel angle you have to resurface the base, so start with smaller angles and increase as needed. Once the base edge bevel is set, maintain (and racers should polish) it as long as possible using diamond, ceramic and gummi stones.
- General Rule #1: Base Edge - Set it and forget it. Do not overwork the base edge. If you increase it above the intended angle, the only way to reset the bevel back to a lower angle is have a shop do a base grind. Any minor roughness can be removed with fine diamonds (even by hand is ok); DO NOT file at all unless you are resetting the bevel angle. Unless you have a reason, leave it as is.
- Side Edge. Mount the ski vertically at 90 degrees. Side edge beveling will give the skis more grip on the snow surface. Higher angles should be reserved for experienced racers; if the angle is too high the ski can 'rail out' on a less experienced racer or light-weight skier. Typical angles are 89 (or 1.0) to 87 (3.0) degrees. 87 has more grip than 89, but an aggressive edge (e.g., 87 or 3.0 degrees), may be more difficult for lighter racers to recover from being up on the edge. Most start at 89/1 degree and transition to 88/2 with skills. Advanced skiers, especially those skiing on icy hard-packed snow, should select an 87/3 degree side bevel.
- After you set your edge angle bevels, substitute the blue diamond stone for the file and go over the edges one more time to polish them. Read the Tuning Tips section on Diamond Stone Care; the stone should be used wet.
- You don't need to use the file again unless you change the angle or have edge damage. The diamond stone will sharpen without severe metal removal (consider adding an 80 mm diamond stone with 200 grit if you feel you need a sharper edge). Sharpen your edges on a weekly basis by using the diamond stone on your side edge only. To repair severe edge damage you may need an abrasive stone.
- After setting the side edge run the gummi stone (grey rubber block with grit) down the edge (holding at a 45 degree angle) from tip to tail very lightly with no pressure to remove hanging burrs left by files/stones.
- General Rule #2: Side Edge - Routine sharpening is achieved from the side edge only. As stated in Rule #1, don't touch the base edge unless it is necessary. Here as well, it is not necessary to repeatedly file your edges to sharpen, removing metal each time in the process. All it takes is 5 minutes to routinely sharpen with diamond stones followed by burr removal with a gummi stone and you're done. If at some point you feel to re-establish the edge, use a file or a 200 grit diamond stone.
- Record the angle settings so for next time you tune.
- For a detailed discussion on this, with pictures, refer to Edge Tuning.
- Now add wax!
- Always start with the ski at room temperature; never start with a cold ski.
- If you have one, use the brass brush to remove old wax/dirt from the base surface, renew structure and open pores for wax infusion (for this step brush in the opposite direction - tail to tip).
- If you don't know the temperature to set the iron to, start at a low temperature and raise it until you have a 4-6 inch trail of melted wax behind the iron. Too short and the iron is too cool; too long and the iron is too hot. Never smoke the wax. See the Wax Iron Setting for guidance.
- Wax each ski for about 3 minutes.
- Let the base cool to room temperature (slowly is best, do not put skis in the cold).
- Scrape off wax with wax scraper (this may take multiple passes) and use the corner of the scraper to remove wax from the edges completely.
- Brush off excess wax from the base tip to tail (a nylon will be fine to remove most wax from the structure or pattern in your base, a horsehair brush (optional) is for polishing).
- General Rule #3: You want wax in your base, not on your base.
- You must remove excess wax. Think of structure like treads on a tire, they need to be open to move water out from your ski/board. This may not seem right at first, adding wax only to scrape it off, but remember this, you ski on your base - not your wax, the wax soaks into the base then bleeds out and lubricates to give speed and protect the base.
- If you are adding a second wax coat of wax, repeat the waxing process, but use the crayon method to apply (read about this in Wax Application). Otherwise, you are done!
- The metal scraper and clear/black ptex rods are for base repair. See Ptex Base Repair for instructions and video.
Diamond [or] Universal Kit Overview and Use [Combined Instructions]
- Swix Side Bevel File Edger Tool for side edge angle 88 (or 2.0) and 89 (or 1.0) deg -- use to set/maintain angles for boards and skis;
- Swiss-made ICECUT metal file to cut and sharpen edges -- first time especially, start with this file to set and establish the angle so as to match it to your tool;
- [**Diamond Kit Only**] Swix 600-grit diamond file for orange edger -- use to routinely sharpen by placing in the edge tool instead of the file because frequent use of the metal file will wear down your edges;
- Swix All Temperature Ski Wax -- rated for all conditions;
- Clear Plexi Wax Scraper -- for scraping excess wax off you ski or board;
- Metal Scraper -- to scrape/plane ptex dripped on to repair base gouges;
- Gummi Stone -- a rubber block with embedded grit for edge rust removal, detuning, and burr removal;
- Small Brass File Cleaning Brush -- used to keep files clean and free of metal waste;
- Clear P-Tex rod -- flow into gouges in your base to repair it, for use in colored areas of base;
- Black P-Tex rod -- flow into gouges in your base to repair it, for use in black areas of base;
- One pair (two) brake retainers -- holds ski brake during edge tuning (not needed for snowboards);
- [**Diamond Kit Only**] Nylon Brush -- the workhorse of wax removal. Designed to be stiff enough to remove wax in less passes to save time.
- [**Universal Kit Only**] White Non-Abrasive Scotchbrite Pad -- use for wax removal;
- Waxing iron -- to apply wax.
- Advanced tuners should refer to more expanded discussions in topic-specific sections of the Learning Center (e.g., Edge Tuning).
- Apply brake retainers to hold brakes away from the work area. Snowboards do not have brakes.
- First prepare your edges. Examine them for roughness or rust; remove these imperfections with the gummi stone as needed.
- Base Edge. Mount the ski flat or at a comfortable angle if your vise permits. The amount of base edge bevel will affect the ability of the ski/board to engage a turn on the snow. The more base edge bevel, the easier it will be to pivot or slide from side to side. Most base bevels are set to 1.0 degrees.
- General Rule #1: Base Edge - Set it and forget it. Do not overwork the base edge. If you increase it above the intended angle, the only way to reset the bevel back to a lower angle is have a shop do a base grind. Any minor roughness can be removed with gummis or fine diamond stones (even by hand is ok); DO NOT attempt to file the base. Unless you have a reason, leave it as is.
- Your tool does NOT work on the base edge. This is for your information only. Base edge tools are sold separately.
- Side Edge. Mount the ski vertically at 90 degrees. Side edge beveling will give the skis more grip on the snow surface. Higher angles should be reserved for experienced racers; if the angle is too high the ski can 'rail out' on a less experienced racer or light-weight skier. Typical angles are 1.0 to 3.0 (89 to 87) degrees. Less angle equals less grip. But an aggressive edge (e.g., 87 degrees), may be more difficult for lighter racers to recover from being up on the edge. Most start at 89/1 degree and transition to 88/2 with skills. Advanced skiers, especially those skiing on icy hard-packed snow, should select an 87/3 degree side bevel.
- The tool is always placed flat on the base for side edge beveling. When flat on the base, the number on the tool’s side touching the base determines the angle to be set. The arrow on the file is the cutting direction.
- [**Diamond Kit Only**] After you set your edge angle bevels, substitute a diamond stone for the file and go over the edges one more time to polish them. Read the Tuning Tips section on Diamond Stone Care; the stone should be used wet.
- [**Diamond Kit Only**] A diamond stone will sharpen without severe metal removal. To repair severe edge damage you may need to use a black diamond stone (these are sold separately and they would have to be used freehand as there are none made to fit the orange tool).
- After setting the side edge, run the gummi stone (grey rubber block with grit) down the edge (holding at a 45 degree angle) from tip to tail very lightly with no pressure to remove hanging burrs left by files/stones.
- General Rule #2: Side Edge - Routine sharpening is achieved from the side edge only. As stated in Rule #1, don't touch the base edge unless it is necessary. Here as well, it is not necessary to repeatedly file your edges to sharpen, removing metal each time in the process. All it takes is 5 minutes to routinely sharpen with diamond stones followed by burr removal with a gummi stone and you're done. If at some point you feel to re-establish the edge, use a metal file.
- Record the side edge angle setting for next time you tune.
- For a detailed discussion on this with pictures refer to the included instruction card or Edge Tuning.
- Now add wax!
- Always start with the ski at room temperature; never start with a cold ski.
- If you have one, use the brass brush to remove old wax/dirt from the base surface; another option is a wax remover - you can buy a citrus-based stove top degreaser from the supermarket for this - but don't spray directly - spray to cloth then wipe the base.
- If you don't know the temperature to set the iron to, start at a low temperature and raise it until you have a 4-6 inch trail of melted wax behind the iron. Too short and the iron is too cool; too long and the iron is too hot. Never smoke the wax. See the Wax Iron Setting for guidance.
- Wax each ski for about 3 minutes.
- Let the base cool to room temperature (slowly is best, do not put skis in the cold).
- Scrape off wax with wax scraper (this may take multiple passes) and use the corner of the scraper to remove wax from the edges completely.
- Brush off excess wax from the base tip to tail with a nylon brush [**Diamond Kit Only**] or white scotchbrite pad [**Universal Kit Only**] will be fine to remove most wax from the base.
- General Rule #3: You want wax in your base, not on your base.
- You must remove excess wax. Think of structure like treads on a tire, they need to be open to move water out from your ski/board. This may not seem right at first, adding wax only to scrape it off, but remember this, you ski on your base - not your wax, the wax soaks into the base then bleeds out and lubricates to give speed and protect the base.
- If you are adding a second wax coat of wax, repeat the waxing process, but use the crayon method to apply (read about this in Wax Application). Otherwise, you are done!
- The metal scraper and clear/black ptex rods are for base repair. See Ptex Base Repair for instructions and video.
2019-2020 Kit Instructions:
2020 Race/Complete/Digital Kits (below) | or jump to FreeRide/Carver Kit Instructions | Quick/EZ-Tune Kit Instructions | For pre-2019, first-generation RaceWax kit instructions, click here.- Edge Bevel Multi Tool with metal file (SKU RB-3503) for a precise edge angle from 0 degree to 5 degrees in 0.5 degree increments -- use to set/establish angles for boards and skis;
- Blue Diamond Stone -- use to routinely sharpen by placing in the edge tool instead of the file because frequent use of the file will wear down your edges;
- (no wax in Race kit) Warm/Cold Temperature Ski Waxes;
- Wax Scraper (long & short included) -- for scraping excess wax off you ski or board, one corner is notched to remove wax from the metal edges;
- Metal Scraper -- to scrape/plane ptex dripped on to repair base gouges;
- Gummi Stone -- a rubber block with embedded grit for edge rust removal, detuning, and burr removal;
- File Cleaning Brush -- used to keep files free of metal waste;
- Clear P-Tex rod -- flow into gouges in your base to repair it, for use in colored areas of base;
- Black P-Tex rod -- flow into gouges in your base to repair it, for use in black areas of base;
- One pair (two) brake retainers -- holds ski brake during edge tuning (not needed for snowboards);
- Brass Brush -- for renewing base structure, opening pores before you wax, and brushing hard waxes (no brushes in Race kit).
- Nylon Brush -- the workhorse of wax removal. Designed to be stiff enough to remove wax in less passes to save you time (no brushes in Race kit).
- Horsehair Brush -- for removing wax from the fine structure of your base (no brushes in Race kit);
- Race -- no iron; Complete -- analog waxing iron; Digital -- digital control/display waxing iron.


Race/Complete/Digital Kit Quick Start Instructions
- Advanced tuners should refer to more expanded discussions in topic-specific sections of the Learning Center (e.g., Edge Tuning).
- Apply brake retainers to hold brakes away from the work area. Snowboards do not have brakes.
- First prepare your edges. Examine them for roughness or nicks; remove these imperfections with gummi or diamond stones as needed.
- If you don't know what angle your ski/board is set at before you start, mark the metal edge with a sharpie, start the tool at the lowest angle and see if it removes the marking on your edge. If not, increase the angle and repeat until the metal file hits the metal edge and removes the mark; that is your bevel angle.
- Base Edge. Mount the ski flat or at a comfortable angle if your vise permits. The amount of base edge bevel will affect the ability of the ski/board to engage a turn on the snow. The more base edge bevel, the easier it will be to pivot or slide from side to side. Most base bevels are set to 1.0 degrees. With a new pair of skis the non-race skier may wish to start with a 0.5 degree bevel, and if your edges are locking in to a turn too soon, you can move up to 0.75 or 1 degree. To go back to a lower bevel angle you have to resurface the base, so start with smaller angles and increase as needed. Once the base edge bevel is set, maintain (and racers should polish) it as long as possible using diamond, ceramic and gummi stones.
- General Rule #1: Base Edge - Set it and forget it. Do not overwork the base edge. If you increase it above the intended angle, the only way to reset the bevel back to a lower angle is to do a base grind. Any minor roughness can be removed with fine diamonds; avoid filing unless you are resetting the bevel angle.
- Side Edge. Mount the ski vertically at 90 degrees. Side edge beveling will give the skis more grip on the snow surface. Higher angles should be reserved for experienced racers; if the angle is too high the ski can 'rail out' on a less experienced racer or light-weight skier. Typical angles are 1.0 to 3.0 (89 to 87) degrees. Less angle equals less grip. But an aggressive edge (e.g., 87 degrees), may be more difficult for lighter racers to recover from being up on the edge. Most start at 89/1 degree and transition to 88/2 with skills. Advanced skiers, especially those skiing on icy hard-packed snow, should select an 87/3 degree side bevel.
- After you set your edge angle bevels, substitute the blue diamond stone for the file and go over the edges one more time to polish them. Read the Tuning Tips section on Diamond Stone Care; the stone should be used wet.
- You don't need to use the file again unless you change the angle or have edge damage. The diamond stone will sharpen without severe metal removal (consider adding a (70 mm) diamond stone in the 200 grit range if you feel you need a sharper edge). Sharpen your edges on a weekly basis by using the diamond stone on your side edge only. To repair severe edge damage you may need a gray DMT or black Moonflex diamond stone.
- After setting the side edge run the gummi stone (grey rubber block with grit) down the edge (holding at a 45 degree angle) from tip to tail very lightly with no pressure to remove hanging burrs left by files/stones.
- General Rule #2: Side Edge - Routine sharpening is achieved from the side edge only. As stated in Rule #1, don't touch the base edge unless it is necessary. Here as well, it is not necessary to repeatedly file your edges to sharpen, removing metal each time in the process. All it takes is 5 minutes to routinely sharpen with diamond stones followed by burr removal with a gummi stone and you're done. If at some point you feel to re-establish the edge, use a fine cut file.
- Record the angle settings so for next time you tune.
- For a detailed discussion on this, with pictures, refer to Edge Tuning.
- Now add wax!
- Always start with the ski at room temperature; never start with a cold ski.
- If you have one, use the brass brush to remove old wax/dirt from the base surface, renew structure and open pores for wax infusion (for this step brush in the opposite direction - tail to tip).
- If you don't know the temperature to set the iron to, start at a low temperature and raise it until you have a 4-6 inch trail of melted wax behind the iron. Too short and the iron is too cool; too long and the iron is too hot. Never smoke the wax. See the Wax Charts for a good starting point.
- Wax each ski for about 3 minutes.
- Let the base cool to room temperature (slowly is best, do not put skis in the cold).
- Scrape off wax with wax scraper (this may take multiple passes) and use the notch in the scraper to remove wax from the edges completely.
- Brush off excess wax from the base tip to tail (a nylon will be fine to remove most wax from the structure or pattern in your base, a horsehair brush (optional) is for polishing).
- General Rule #3: You want wax in your base, not on your base.
- You must remove excess wax. Think of structure like treads on a tire, they need to be open to move water out from your ski/board. This may not seem right at first, adding wax only to scrape it off, but remember this, you ski on your base - not your wax, the wax soaks into the base then bleeds out and lubricates to give speed and protect the base.
- If you are adding a second wax coat of fluoro speed wax, repeat the waxing process, but use the crayon method to apply (read about this in Wax Application). Otherwise, you are done!
- The metal scraper and clear/black ptex rods are for base repair. See Ptex Base Repair for instructions and video.
RaceWax FreeRide/Carver Kit Overview and Use
- RaceWax Side Bevel File Guide 4 Degree Edge Tuner 90-89-88-87 Degrees;
- Blue Diamond Stone -- use to routinely sharpen by placing in the edge tool instead of the file because frequent use of the file will wear down your edges;
- All Temperature Ski Wax -- rated for all conditions;
- Triangle Wax Scraper -- for scraping excess wax off you ski or board, one corner is notched to remove wax from edges;
- Metal Scraper -- to scrape/plane ptex dripped on to repair base gouges;
- Gummi Stone -- for edge rust removal, detuning, and burr removal;
- File Cleaning Brush -- used to keep files free of metal waste;
- Clear P-Tex rod -- flow into gouges in your base to repair it, for use in colored areas of base;
- Black P-Tex rod -- flow into gouges in your base to repair it, for use in black areas of base;
- One pair (two) brake retainers -- holds ski brake during edge tuning (not needed for snowboards);
- Nylon Brush -- the workhorse of wax removal. Designed to be stiff enough to remove wax in less passes to save you time.
- Waxing iron -- to apply wax (FreeRide kit has no iron).
- Advanced tuners should refer to more expanded discussions in topic-specific sections of the Learning Center (e.g., Edge Tuning).
- Apply brake retainers to hold brakes away from the work area. Snowboards do not have brakes.
- First prepare your edges. Examine them for roughness or nicks; remove these imperfections with gummi or diamond stones as needed.
- Base Edge. Mount the ski flat or at a comfortable angle if your vise permits. The amount of base edge bevel will affect the ability of the ski/board to engage a turn on the snow. The more base edge bevel, the easier it will be to pivot or slide from side to side. Most base bevels are set to 1.0 degrees.
- General Rule #1: Base Edge - Set it and forget it. Do not overwork the base edge. If you increase it above the intended angle, the only way to reset the bevel back to a lower angle is to do a base grind. Any minor roughness can be removed with fine diamonds; avoid filing unless you are resetting the bevel angle.
- Your tool does NOT work on the base edge. This is for your information only. Base edge tools are sold separately.
- Side Edge. Mount the ski vertically at 90 degrees. Side edge beveling will give the skis more grip on the snow surface. Higher angles should be reserved for experienced racers; if the angle is too high the ski can 'rail out' on a less experienced racer or light-weight skier. Typical angles are 1.0 to 3.0 (89 to 87) degrees. Less angle equals less grip. But an aggressive edge (e.g., 87 degrees), may be more difficult for lighter racers to recover from being up on the edge. Most start at 89/1 degree and transition to 88/2 with skills. Advanced skiers, especially those skiing on icy hard-packed snow, should select an 87/3 degree side bevel.
- The tool is always placed flat on the base for side edge beveling. When flat on the base, the number on the tool’s side touching the base determines the angle to be set. The arrow on the file is the cutting direction.
- After you set your edge angle bevels, substitute a diamond stone for the file and go over the edges one more time to polish them; the stone should be used wet.
- A diamond stone will sharpen without severe metal removal. To repair severe edge damage you may need a black diamond stone.
- After setting the side edge, run the gummi stone (grey rubber block with grit) down the edge (holding at a 45 degree angle) from tip to tail very lightly with no pressure to remove hanging burrs left by files/stones.
- General Rule #2: Side Edge - Routine sharpening is achieved from the side edge only. As stated in Rule #1, don't touch the base edge unless it is necessary. Here as well, it is not necessary to repeatedly file your edges to sharpen, removing metal each time in the process. All it takes is 5 minutes to routinely sharpen with diamond stones followed by burr removal with a gummi stone and you're done. If at some point you feel to re-establish the edge, use a metal file.
- Record the angle settings so for next time you tune.
- For a detailed discussion on this with pictures refer to the included instruction card or Edge Tuning.
- Now add wax!
- Always start with the ski at room temperature; never start with a cold ski.
- If you don't know the temperature to set the iron to, start at a low temperature and raise it until you have a 4-6 inch trail of melted wax behind the iron. Too short and the iron is too cool; too long and the iron is too hot. Never smoke the wax. See the Wax Charts for a good starting point.
- Wax each ski for about 3 minutes.
- Let the base cool to room temperature (slowly is best, do not put skis in the cold). Scrape off wax with wax scraper (this may take multiple passes) and use the notch in the scraper to remove wax from the edges completely.
- Brush off excess wax from the base (a nylon will be fine to remove most wax from the structure or pattern in your base, a horsehair brush (optional) is for polishing).
- General Rule #3: You want wax in your base, not on your base.
- You must remove excess wax. Think of structure like treads on a tire, they need to be open to move water out from your ski/board. This may not seem right at first, adding wax only to scrape it off, but remember this, you ski on your base - not wax, the wax soaks into the base then bleeds out and lubricates to give speed and protect the base.
- If you are adding a second wax coat of fluoro speed wax, repeat the waxing process, but use the crayon method to apply (read about this in Wax Application). Otherwise, you are done!
- The metal scraper and clear/black ptex rods are for base repair. See Ptex Base Repair for instructions and video.
RaceWax 2020 EZ-Tune Tuning Kit, Overview and Use
- RaceWax Side Bevel File Guide 4 Degree Edge Tuner 90-89-88-87 Degrees;
- All Temperature Ski Wax -- rated for all conditions;
- Triangle Wax Scraper -- for scraping excess wax off you ski or board, one corner is notched to remove wax from edges;
- Metal Scraper -- to scrape/plane ptex dripped on to repair base gouges;
- Gummi Stone -- for edge rust removal, detuning, and burr removal;
- File Cleaning Brush -- used to keep files free of metal waste;
- Clear P-Tex rod -- flow into gouges in your base to repair it, for use in colored areas of base;
- Black P-Tex rod -- flow into gouges in your base to repair it, for use in black areas of base;
- One pair (two) brake retainers -- holds ski brake during edge tuning (not needed for snowboards);
- Non-abrasive Fibertex pad for buffing after scraping wax -- if you don't have a brush, this pad will do the job;
- Waxing iron -- to apply wax.
- Advanced tuners should refer to more expanded discussions in topic-specific sections of the Learning Center (e.g., Edge Tuning).
- Apply brake retainers to hold brakes away from the work area. Snowboards do not have brakes.
- First prepare your edges. Examine them for roughness or nicks; remove these imperfections with gummi or diamond stones as needed.
- Base Edge. Mount the ski flat or at a comfortable angle if your vise permits. The amount of base edge bevel will affect the ability of the ski/board to engage a turn on the snow. The more base edge bevel, the easier it will be to pivot or slide from side to side. Most base bevels are set to 1.0 degrees.
- General Rule #1: Base Edge - Set it and forget it. Do not overwork the base edge. If you increase it above the intended angle, the only way to reset the bevel back to a lower angle is to do a base grind. Any minor roughness can be removed with fine diamonds; avoid filing unless you are resetting the bevel angle.
- Your tool does NOT work on the base edge. This is for your information only. Base edge tools are sold separately.
- Side Edge. Mount the ski vertically at 90 degrees. Side edge beveling will give the skis more grip on the snow surface. Higher angles should be reserved for experienced racers; if the angle is too high the ski can 'rail out' on a less experienced racer or light-weight skier. Typical angles are 1.0 to 3.0 (89 to 87) degrees. Less angle equals less grip. But an aggressive edge (e.g., 87 degrees), may be more difficult for lighter racers to recover from being up on the edge. Most start at 89/1 degree and transition to 88/2 with skills. Advanced skiers, especially those skiing on icy hard-packed snow, should select an 87/3 degree side bevel.
- The tool is always placed flat on the base for side edge beveling. When flat on the base, the number on the tool’s side touching the base determines the angle to be set. The arrow on the file is the cutting direction.
- After you set your edge angle bevels, substitute a diamond stone for the file and go over the edges one more time to polish them; the stone should be used wet.
- A diamond stone will sharpen without severe metal removal. To repair severe edge damage you may need a black diamond stone.
- After setting the side edge, run the gummi stone (grey rubber block with grit) down the edge (holding at a 45 degree angle) from tip to tail very lightly with no pressure to remove hanging burrs left by files/stones.
- General Rule #2: Side Edge - Routine sharpening is achieved from the side edge only. As stated in Rule #1, don't touch the base edge unless it is necessary. Here as well, it is not necessary to repeatedly file your edges to sharpen, removing metal each time in the process. All it takes is 5 minutes to routinely sharpen with diamond stones followed by burr removal with a gummi stone and you're done. If at some point you feel to re-establish the edge, use a metal file.
- Record the angle settings so for next time you tune.
- For a detailed discussion on this with pictures refer to the included instruction card or Edge Tuning.
- Now add wax!
- Always start with the ski at room temperature; never start with a cold ski.
- If you don't know the temperature to set the iron to, start at a low temperature and raise it until you have a 4-6 inch trail of melted wax behind the iron. Too short and the iron is too cool; too long and the iron is too hot. Never smoke the wax. See the Wax Charts for a good starting point.
- Wax each ski for about 3 minutes.
- Let the base cool to room temperature (slowly is best, do not put skis in the cold). Scrape off wax with wax scraper (this may take multiple passes) and use the notch in the scraper to remove wax from the edges completely.
- Brush off excess wax from the base with the white pad.
- General Rule #3: You want wax in your base, not on your base.
- You must remove excess wax. Think of structure like treads on a tire, they need to be open to move water out from your ski/board. This may not seem right at first, adding wax only to scrape it off, but remember this, you ski on your base - not wax, the wax soaks into the base then bleeds out and lubricates to give speed and protect the base.
- If you are adding a second wax coat of wax, repeat the waxing process. Otherwise, you are done!
- The metal scraper and clear/black ptex rods are for base repair. See Ptex Base Repair for instructions and video.
RaceWax 2020 Quick Tuning Kit, Overview and Use
- Edge Beveler for 88 / 90 side edge angles -- use to set/establish angles for boards and skis; the file for this tool is two-sided with a coarse double-cut side for establishing the edge and a single-cut side for fine cuts/sharpening.
- Gummi Stone -- for edge rust removal, detuning, and burr removal;
- All Temperature Wax -- rated for all conditions;
- Triangle Wax Scraper -- for scraping excess wax off you ski or board, one corner is notched to remove wax from edges;
- Metal Scraper -- to scrape/plane ptex dripped on to repair base gouges;
- Clear P-Tex rod -- flow into gouges in your base to repair it, for use in colored areas of base;
- Black P-Tex rod -- flow into gouges in your base to repair it, for use in black areas of base;
- Brake Retainer -- holds ski brake during edge tuning (not needed for snowboards);
- Non-abrasive Fibertex pad -- for buffing after scraping wax.
- Apply brake retainers to hold brakes away from the work area. Snowboards do not have brakes.
- First prepare your edges.
- Base Edge. Mount the ski flat. Examine the base edge for roughness or nicks; use the gummi stone to remove these imperfections by hand.
- General Rule #1: Base Edge - Set it and forget it. Any minor roughness can be removed with a stone; avoid filing.
- Your tool does NOT work on the base edge. This is for your information only. Base edge tools are sold separately.
- Side Edge. Mount the ski vertically at 90 degrees. Side edge beveling will give the skis more grip on the snow surface. The most common angle is 2.0 (or 88) degrees. Less angle equals less grip. We recommend the 88 over the 90 degrees for this reason.
- General Rule #2: Side Edge - Routine sharpening is achieved from the side edge only.
- Select the file side with a coarse double-cut side for establishing the edge and a single-cut side for fine cuts/sharpening.
- Sharpen the side edge.
- After setting the side edge, run the gummi stone (grey rubber block with grit) down the edge (holding at a 45 degree angle) from tip to tail very lightly with no pressure to remove hanging burrs left by files/stones.
- Use a waxing iron (not included) to add wax!
- Always start with the ski at room temperature; never start with a cold ski.
- If you don't know the temperature to set the iron to, start at a low temperature and raise it until you have a 4-6 inch trail of melted wax behind the iron. Too short and the iron is too cool; too long and the iron is too hot. Never smoke the wax. See the Wax Charts for a good starting point.
- Wax each ski for about 3 minutes.
- Let the base cool to room temperature (slowly is best, do not put skis in the cold). Scrape off wax with wax scraper (this may take multiple passes) and use the notch in the scraper to remove wax from the edges completely.
- Brush off excess wax from the base with the white buffing pad.
- General Rule #3: You want wax in your base, not on your base.
- You must remove excess wax. Think of structure like treads on a tire, they need to be open to move water out from your ski/board. This may not seem right at first, adding wax only to scrape it off, but remember this, you ski on your base - not wax, the wax soaks into the base then bleeds out and lubricates to give speed and protect the base.
- You are done!
- The metal scraper and clear/black ptex rods are for base repair. See Ptex Base Repair for instructions and video.
Pre-Summer 2019 Kit Instructions:
Deluxe/Race/Complete/Podium Kits (below) | or jump to FreeRide/Carver Kit Instructions | Quick/EZ-Tune Kit Instructions- Edge Bevel Multi Tool with metal file (SKU RB-3503) for a precise edge angle from 0 degree to 5 degrees in 0.5 degree increments -- use to set/establish angles for boards and skis;
- Blue DMT Diamond Stone -- use to routinely sharpen by placing in the edge tool instead of the file because frequent use of the file will wear down your edges;
- All Temperature Ski Wax -- rated for all conditions;
- Wax Scraper (long & short included) -- for scraping excess wax off you ski or board, one corner is notched to remove wax from the metal edges;
- Metal Scraper -- to scrape/plane ptex dripped on to repair base gouges;
- Gummi Stone -- a rubber block with embedded grit for edge rust removal, detuning, and burr removal;
- File Cleaning Brush -- used to keep files free of metal waste;
- Clear P-Tex rod -- drip into gouges in your base to repair it, for use in colored areas of base;
- Black P-Tex rod -- drip into gouges in your base to repair it, for use in black areas of base;
- One pair (two) plastic hook brake retainers -- holds ski brake during edge tuning (not needed for snowboards);
- Brass Brush -- for renewing base structure, opening pores before you wax, and brushing hard waxes (optional, Race-Speed/Complete/Podium).
- Nylon Brush -- the workhorse of wax removal. Designed to be stiff enough to remove wax in less passes to save you time.
- Horsehair Brush -- for removing wax from the fine structure of your base (optional, Race-Speed/Complete/Podium).
Deluxe/Race/Complete/Podium Kit Quick Start Instructions
- Advanced tuners should refer to more expanded discussions in topic-specific sections of the Learning Center (e.g., Edge Tuning).
- Apply brake retainers to hold brakes away from the work area. Snowboards do not have brakes.
- First prepare your edges. Examine them for roughness or nicks; remove these imperfections with stones and files as needed.
- If you don't know what angle your ski/board is set at before you start, mark the metal edge with a sharpie, start the tool at the lowest angle and see if it removes the marking on your edge. If not, increase the angle and repeat until it removes the mark; that is your bevel angle.
- Base Edge. Mount the ski flat or at a comfortable angle if your vise permits. The amount of base edge bevel will affect the ability of the ski/board to engage a turn on the snow. The more base edge bevel, the easier it will be to pivot or slide from side to side. Most base bevels are set to 1.0 degrees. With a new pair of skis the non-race skier may wish to start with a 0.5 degree bevel, and if your edges are locking in to a turn too soon, you can move up to 0.75 or 1 degree. To go back to a lower bevel angle you have to resurface the base, so start with smaller angles and increase as needed. Once the base edge bevel is set, maintain (and racers should polish) it as long as possible using diamond, ceramic and gummi stones.
- General Rule #1: Base Edge - Set it and forget it. Do not overwork the base edge. If you increase it above the intended angle, the only way to reset the bevel back to a lower angle is to do a base grind. Any minor roughness can be removed with fine diamonds; avoid filing unless you are resetting the bevel angle.
- Side Edge. Mount the ski vertically at 90 degrees. Side edge beveling will give the skis more grip on the snow surface. Higher angles should be reserved for experienced racers; if the angle is too high the ski can 'rail out' on a less experienced racer or light-weight skier. Typical angles are 1.0 to 3.0 (89 to 87) degrees. Less angle equals less grip. But an aggressive edge (high angle), may be more difficult for lighter racers to recover from being up on the edge. Most start at 89/1 degree and transition to 88/2 with skills. Advanced skiers, especially those skiing on icy hard-packed snow, should select an 87/3 degree side bevel.
- After you set your edge angle bevels, substitute the blue DMT diamond stone for the file and go over the edges one more time to polish them. Read the section on Diamond Stone Care; the stone should be used wet.
- You don't need to use the file again unless you change the angle or have edge damage. The diamond stone will sharpen without severe metal removal (consider adding a (70 mm) diamond stone in the 200 grit range if you feel you need a sharper edge). Sharpen your edges on a weekly basis by using the diamond stone on your side edge only. To repair severe edge damage you may need a gray DMT or black Moonflex diamond stone.
- After setting the side edge run the gummi stone (grey rubber block with grit) down the edge (holding at a 45 degree angle) from tip to tail very lightly with no pressure to remove hanging burrs left by files/stones.
- General Rule #2: Side Edge - Routine sharpening is achieved from the side edge only. As stated in Rule #1, don't touch the base edge unless it is necessary. Here as well, it is not necessary to repeatedly file your edges to sharpen, removing metal each time in the process. All it takes is 5 minutes to routinely sharpen with diamond stones followed by burr removal with a gummi stone and you're done. If at some point you feel to re-establish the edge, use a fine cut file.
- I like to record the angle settings so I remember next time I tune; I usually write it in the under-the-foot area.
- For a detailed discussion on this with pictures refer to Edge Tuning.
- Now add wax!
- Always start with the ski at room temperature; never start with a cold ski.
- If you have one, use the brass brush to remove old wax/dirt from the base surface, renew structure and open pores for wax infusion (for this step brush in the opposite direction - tail to tip).
- If you don't know the temperature to set the iron to, start at a low temperature and raise it until you have a 4-6 inch trail of melted wax behind the iron. Too short and the iron is too cool; too long and the iron is too hot. Never smoke the wax. See the Wax Charts for a good starting point.
- Wax each ski for about 3 minutes.
- Let the base cool to room temperature (slowly is best, do not put skis in the cold). Scrape off wax with wax scraper (this may take multiple passes) and use the notch in the scraper to remove wax from the edges completely.
- Brush off excess wax from the base (a nylon will be fine to remove most wax from the structure or pattern in your base, a horsehair brush (optional) is for polishing).
- General Rule #3: You want wax in your base, not on your base.
- You must remove excess wax. Think of structure like treads on a tire, they need to be open to move water out from your ski/board. This may not seem right at first, adding wax only to scrape it off, but remember this, you ski on your base - not wax, the wax soaks into the base then bleeds out and lubricates to give speed and protect the base.
- If you are adding a second wax coat of fluoro speed wax, repeat the waxing process, but use the crayon method to apply (read about this in Wax Application). Otherwise, you are done!
- The metal scraper and clear/black ptex rods are for base repair. See Ptex Base Repair for instructions and video.
- Pocket II Racing Base & Edge Beveler for 88/89 side and 1 degree base edge angles with metal file -- use to set angles for boards and skis;
- All Temperature Ski Wax -- rated for all conditions;
- Triangle Wax Scraper -- for scraping excess wax off you ski or board, one corner is notched to remove wax from edges;
- Metal Scraper -- to scrape/plane ptex dripped on to repair base gouges;
- Gummi Stone -- for edge rust removal, detuning, and burr removal;
- File Cleaning Brush -- used to keep files free of metal waste;
- Clear P-Tex rod -- drip into gouges in your base to repair it, for use in colored areas of base;
- Black P-Tex rod -- drip into gouges in your base to repair it, for use in black areas of base;
- One pair (two) brake retainers -- holds ski brake during edge tuning (not needed for snowboards);
- Nylon Brush -- the workhorse of wax removal. Designed to be stiff enough to remove wax in less passes to save you time.
Pre-2019 FreeRide/Carver Kit Quick Start Instructions
- Advanced tuners should refer to more expanded discussions in topic-specific sections of the Learning Center (e.g., Edge Tuning).
- Apply brake retainers to hold brakes away from the work area. Snowboards do not have brakes.
- First prepare your edges. Examine them for roughness or nicks; remove these imperfections with stones and files as needed.
- Base Edge. Mount the ski flat or at a comfortable angle if your vise permits. The amount of base edge bevel will affect the ability of the ski/board to engage a turn on the snow. The more base edge bevel, the easier it will be to pivot or slide from side to side. Most base bevels are set to 1.0 degrees and this is the setting for the edge tool (Pocket-II (RB-3607)) in this kit.
- General Rule #1: Base Edge - Set it and forget it. Do not overwork the base edge. If you increase it above the intended angle, the only way to reset the bevel back to a lower angle is to do a base grind. Any minor roughness can be removed with fine diamonds; avoid filing unless you are resetting the bevel angle.
- Side Edge. Mount the ski vertically at 90 degrees. Side edge beveling will give the skis more grip on the snow surface. Most commonly, angles are 1.0 or 2.0 (89 or 88) degrees. Less angle equals less grip. Most start at 89/1 degree and transition to 88/2 with skills.
- (optional) After you set your edge angle bevels, substitute a diamond stone for the file and go over the edges one more time to polish them; the stone should be used wet.
- A diamond stone will sharpen without severe metal removal. Consider adding a (70 mm) diamond stone or two to sharpen your edges on a weekly basis; this can be accomplished from the side edge only. To repair severe edge damage you may need a gray DMT or black Moonflex diamond stone.
- After setting the side edge, run the gummi stone (grey rubber block with grit) down the edge (holding at a 45 degree angle) from tip to tail very lightly with no pressure to remove hanging burrs left by files/stones.
- General Rule #2: Side Edge - Routine sharpening is achieved from the side edge only. As stated in Rule #1, don't touch the base edge unless it is necessary. Here as well, it is not necessary to repeatedly file your edges to sharpen, removing metal each time in the process. All it takes is 5 minutes to routinely sharpen with diamond stones followed by burr removal with a gummi stone and you're done. If at some point you feel to re-establish the edge, use a fine cut file.
- I like to record the angle settings so I remember next time I tune; I usually write it in the under-the-foot area.
- For a detailed discussion on this with pictures refer to Edge Tuning.
- Now add wax!
- Always start with the ski at room temperature; never start with a cold ski.
- If you don't know the temperature to set the iron to, start at a low temperature and raise it until you have a 4-6 inch trail of melted wax behind the iron. Too short and the iron is too cool; too long and the iron is too hot. Never smoke the wax. See the Wax Charts for a good starting point.
- Wax each ski for about 3 minutes.
- Let the base cool to room temperature (slowly is best, do not put skis in the cold). Scrape off wax with wax scraper (this may take multiple passes) and use the notch in the scraper to remove wax from the edges completely.
- Brush off excess wax from the base (a nylon will be fine to remove most wax from the structure or pattern in your base, a horsehair brush (optional) is for polishing).
- General Rule #3: You want wax in your base, not on your base.
- You must remove excess wax. Think of structure like treads on a tire, they need to be open to move water out from your ski/board. This may not seem right at first, adding wax only to scrape it off, but remember this, you ski on your base - not wax, the wax soaks into the base then bleeds out and lubricates to give speed and protect the base.
- If you are adding a second wax coat of fluoro speed wax, repeat the waxing process, but use the crayon method to apply (read about this in Wax Application). Otherwise, you are done!
- The metal scraper and clear/black ptex rods are for base repair. See Ptex Base Repair for instructions and video.
- Edge Beveler for 88 / 90 side edge angles -- use to set/establish angles for boards and skis; the file for this tool is two-sided with a coarse double-cut side for establishing the edge and a single-cut side for fine cuts/sharpening.
- All Temperature Wax -- rated for all conditions;
- Triangle Wax Scraper -- for scraping excess wax off you ski or board, one corner is notched to remove wax from edges;
- Metal Scraper -- to scrape/plane ptex dripped on to repair base gouges;
- Clear P-Tex rod -- drip into gouges in your base to repair it, for use in colored areas of base;
- Black P-Tex rod -- drip into gouges in your base to repair it, for use in black areas of base;
- Brake Retainer -- holds ski brake during edge tuning (not needed for snowboards);
- Non-abrasive Fibertex pad for buffing after scraping wax -- if you don't have a brush, this pad will do the job;
Pre-2019 Quick/EZ-Tune Kit Quick Start Instructions
- Apply brake retainers to hold brakes away from the work area. Snowboards do not have brakes.
- First prepare your edges.
- Base Edge. Mount the ski flat. Examine the base edge for roughness or nicks; consider buying a gummi or diamond stone to remove these imperfections by hand. A 320 (or greater) grit aluminum oxide sandpaper
- General Rule #1: Base Edge - Set it and forget it. Any minor roughness can be removed with a stone; avoid filing.
- Side Edge. Mount the ski vertically at 90 degrees. Side edge beveling will give the skis more grip on the snow surface. The most common angle is 2.0 (or 88) degrees. Less angle equals less grip. We recommend the 88 over the 90 degrees for this reason.
- General Rule #2: Side Edge - Routine sharpening is achieved from the side edge only.
- Select the file side with a coarse double-cut side for establishing the edge and a single-cut side for fine cuts/sharpening.
- Sharpen the side edge.
- (very) Lightly go over the base edge flush/flat against the base edge with a gummi, 320/400 grit sandpaper, or fine diamond stone to remove any burrs.
- Now add wax!
- Always start with the ski at room temperature; never start with a cold ski.
- If you don't know the temperature to set the iron to, start at a low temperature and raise it until you have a 4-6 inch trail of melted wax behind the iron. Too short and the iron is too cool; too long and the iron is too hot. Never smoke the wax. See the Wax Charts for a good starting point.
- Wax each ski for about 3 minutes.
- Let the base cool to room temperature (slowly is best, do not put skis in the cold). Scrape off wax with wax scraper (this may take multiple passes) and use the notch in the scraper to remove wax from the edges completely.
- Brush off excess wax from the base with the white buffing pad.
- General Rule #3: You want wax in your base, not on your base.
- You must remove excess wax. Think of structure like treads on a tire, they need to be open to move water out from your ski/board. This may not seem right at first, adding wax only to scrape it off, but remember this, you ski on your base - not wax, the wax soaks into the base then bleeds out and lubricates to give speed and protect the base.
- You are done!
- The metal scraper and clear/black ptex rods are for base repair. See Ptex Base Repair for instructions and video.
Tuning Tips
- Wax Wizard
- Tuning Tips
- Tuning Tips Overview
- Quick Tuning Guide
- Base Structure Theory
- Edge Tuning
- Ptex Base Repair
- Diamond Stone Care & Use
- Sidewall Cutting
- Wax Application
- Wax Iron Setting
- Choosing Wax
- Wax Charts
- Choosing Tuning Kits
- Tuning Kit Instructions
- Essential Equipment List
- Powder Application
- New Skis/Board Care
- Spring Tuneup
- Summer Storage
- Buying at Ski Swap Sales
- Questions and Answers
- Video Archive Overview
- Newsletter Signup